Tuesday, 22 September 2015

From the dog and the girls!!!!

Post 168
Today's card was a challenge for me, as I told the recipient, I REALLY don't like including photos in my cards.
 This dog is an integral part , as it is from the dog and the ladies' work mates.
So as far as I'm concerned the best way to treat a photo on a card is to treat it like a photo on a card!!!!!
So, I used the Mama Elephant 'Polaroid fun', to cut the photo and it's frame.


The 'Girls' also needed a polaroid, so I used the smaller frame in the die set to cut each lady out of the Art Impression stamp 'Uptown Girls'. I did have to stamp the image several times to fit the die around each individual. I coloured these images simply with my Kuretake Clean Color real brush markers, using glossy accents on the sun glasses once the card was complete.


I cut the frames out in white and black, then stacked them just a tiny bit off centre to give that dimension around the picture.


The greeting was embossed in white on some vellum, with the number die cut and also treated with glossy accents. Then card was completed using some sequins and gems scattered around the images.


And inside, the greeting, as requested, with the paw print . The dog comes from the MFT stamp set 'You make my tail wag'


I hope you like todays card. It feels good to be challenged, then actually like what you've made.
Happy crafting.
Clair xxxx


Monday, 21 September 2015

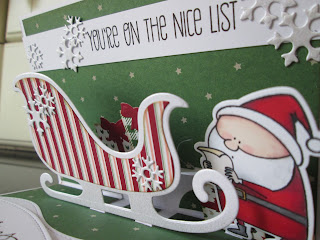
Sleigh pop up

Post 167
Good Morning crafty friends...back to the Festive Season...LOVE IT!
Todays card is a true mash up of my crafty stash. I've used MFT's 'Jingle all the way' stamps and dies, Paper Smooches 'Christmas Words' dies and the completely fabulous 'Sleigh gift card holder' by Karen Burniston at Elizabeth Craft Designs.


The front of the card is lovely and simple. The words die cut out of gun metal mirri card, the Christmas has been cut 3 times and stacked up to give plenty of dimension.
The tree is from 'Jingle all the way', die cut and stamped , then paper pieced for the greenery.


It's the inside I'm dead chuffed with. This is the first time I've used these dies and it certainly will not be the last. I highly recommend you watch Karen showing you the tricks and tips of using these dies. You'll find a tutorial HERE.


The decorative paper I've used is from Stampin up, it's last years christmas paper stack which is no longer available HERE is this years, check out the other festive papers too...lovely!


Everything was cut and put together as is shown in the you tube video. I then thought it needed something else. MFT's Santa in 'Jingle all the way' was just perfect. Die cut, stamped and coloured with my pro markers he fits perfectly at the side of the sleigh. He looks to be over hanging the side of the card but that is the fabulous sleigh die, the pop stands Santa is on is angled slightly so he pops up and out! 
The sentiment across the top of the card is also from the MFT's stamp set.


To finish the card I die cut some card using Lawn fawns 'Stitched Hillside borders' added a sentiment from Stampin ups beautiful 'Endless Wishes' (sorry last years again, no longer available!)


The snowflakes complete the card.


Not a card for mass production, but easy to do and what a treat to open in the run up to Christmas.
 Hope you like todays card.
Let me know.
Happy crafting.
Clair xxx


Saturday, 19 September 2015

Lotus...the return!!

Post 166
Sorry about the silly title, but this flower and its sister stamps are just a fabulous go to stamp set, it is of course Waffle Flowers 'Lotus'


The image is stamped and embossed in silver on some water colour card, and coloured using my Kuretake clean color real brush markers.


I coloured a scrap of paper with the same colours and die cut the number.
The rest of the birthday greeting was a mash up from Waffle flower and Mama Elephant stamp sets.


All embellished with self adhesive gems and silver sequins. And finished with a strip of gunmetal cardstock down one side.


Hope you like todays card. 
Let me know.
Happy crafting.
Clair xxx


Friday, 18 September 2015

Christmas.... 3 for 1

Post 165

I thought I'd share these 3 cards I made...all the same technique, and simple to mass produce.
I was inspired by Nichol Magouirk making this card.
I used the Indigoblu 'Baroque Christmas Tree' , I stamped and embossed in white onto some water colour card.
I also stamped and embossed my greeting , from Winnie and Walter, 'The Big,The Bold and the merry, using Ranger Platinum embossing powder.


I smooshed some ink pads onto my craft sheet, spritzed with water and dabbed my paper into it, I allowed it to dry and then went back into the ink to add interest and fill gaps.


The cards were finished with a mixture of white sequins and die cut embossed stars.
I added a strip of stripy embossed card down one side with a wash of the same colours.


Each card was done in the same way.


I just added a doodled border to this final one an a little glossy accents on the baubles. This is another stamp from Indigoblu called 'Frosted Baubles'.


I hope you like todays cards.
Let me know.
Happy crafting.
Clair xxx

Thursday, 17 September 2015

Christmas .... again

Post 164
Hello there crafty friends, yes I'm on Christmas ...again!! Sorry!
Todays card uses the My Favorite Things stamps 'Jingle all The Way' and also one of their dies, the 'Christmas tree cutout'
I initially wanted to use the paper stack I bought last year from Stampin up ( no longer available, but this years stacks are fab!!! watch this space)
I started with a kraft card base, stamped all over with some snow flakes (again from Stampin up last year and no longer available) in white pigment ink. I die cut the Christmas tree cut out, off to one side as I needed to fit santa in.


Santa is stamped on white card, gloves face and feet coloured with my pro markers , and his out fit paper pieced from some of the plaid paper from the stack. 


The sentiment is from the stamp set, and the finishing touch of paper down the side matches Santas suit. The card is for Christmas so sparkle HAD to be included , in the form of sequins and die cut stars


Hope you like todays card.
Let me know.
Happy crafting.
Clair xxx

Saturday, 12 September 2015

Simply flowers

Post 163
Todays card is one that will be good for many occasions.
I used the 'Flower Garden' stamps from Stampers Anonymous.

I stamped two flower heads and their stems in  Black versafine ink, along with a sentiment from 
W Plus 9's 'Doodle Buds'


I used a pink and orange from the Kuretake real brush clean color markers to paint the flowers, adding some pale blue and washing it out around the edges, just to make the flowers pop. 
I doodled a double line around the water colour card stock and mounted it on some tan card, on a A6 card base.
Using some clear and white sequins to complete the card.


I hope you like todays card. Please let me know.
Happy crafting.
Clair xxx

Thursday, 10 September 2015

Window Scene

Post 162
Good morning crafty friends. I'm motoring with the Christmas cards this week. Today's card uses one of the windows from the Trim Craft Tag Windows die set, cut out in black and inlaid into the card.


I stamped a snowy scene in the window using an older set from Clarity stamp ' Christmas Minatures', I used some blue ink to create the snow bank around the trees and the sky. Adding the cute snowman in the corner.


I finished the card off with some clear sequins. And a greeting from the retired Stampin up set 'Endless Wishes'


Hope you like todays card.
Let me know!
Happy crafting 
Clair xxx

Saturday, 5 September 2015

Doodle balloons

Post 161
Todays card combines Doodle Buds and Unforgettable
I was inspired by the wonderful Julia Altemann, who made some animal stamps into balloons simple by adding a tie and a string HERE.


This elephant obviously needed an alternative balloon to carry him away so why not the doodle buds.
The images were stamped onto watercolour card, and coloured with  my Clean Color markers.
I painted in the ground and a few clouds to finish the scene.


The balloons needed glossy accent, of course.


The fabulous sentiment is from the Doodle Buds set.
The card was completed with  some doodling around the card.


Hope you like todays card, let me know.
Happy crafting .
Clair xxx

Friday, 4 September 2015

More Fairy lights

Post 160
A variation on a theme...see post 157, just using a rainbow of colours and adding in wink of stella to the lights before using glossy accents.


Hope you like this variation on the theme,makes for quick production line style Christmas cards without getting too boring!
Happy Crafting.
 Clair xxx

Thursday, 3 September 2015

Purple Santa.

Post 159
'Jingle all the way', was out to play again today, along with the 'Festive Greetings'.
The Santa, tree and presents are all stamped and embossed in white. I used my Clean Color real brush markers to colour in cool shades of blue and purple.

Santa looked weird once I'd done, I decided it was his white eyes! I went over the embossing with a black marker to rectify this.


The extra presents were stamped and cut out to finish the image.
And the sentiment stamped and embossed in silver.


To bring the card together I stamped the Pinstripe background onto my base card and used the same colours to fill it in.


Hope you like todays card, please let me know.
Happy crafting.
Clair xxx